Hey Guys & Gals
Over the past year especially I have been receiving more ECO CAST or At home audition opportunities. "Opportunities" is an interesting word. Because I am not a cinematographer, I don't have pro lights or a Red HD camera or boom mic. SO I found this seemingly convenient at home audition thing was completely not convenient at all.
With the uprise of Youtube celebrities and Selfie Nation I feel really in adequate to "DO IT MYSELF". Some of these "at home videos" are really really good and seem to have professional lighting. A casting studio is set up to make you look at least decent because they need to look good so you to get the job, but they too still show flaws. I don't need to be tech savvy when I arrive though, I just need to bring a good audition. That is my job. Now, I am expected to Act, Find a reader, Light myself & Have a camera?! Cell phones now have great cameras thank goodness, but anyone else feel like they look out of whack or distorted on them sometimes? No, just me?! Great! haha
In LA, and I am sure in NY there are a lot of studios you can pay anywhere from $25-65 to tape your audition for you. Great idea & great money maker. Just another place we actors, mostly struggling artist have to pay to just be considered for a role. Anyway if you can't tell after a few of these on my own I started to become a bit bitter. Finding the right lighting, clearing a wall, or rigging my boyfriends painters lights when it's too dark, using my cell or an old cam corder a friend let us borrow that he never took back, running out of room on the tape, or it doesn't synch with sound, oh and i don't have enough time to get a reader or to hold said camera for my slate....I mean the list goes on for hiccups that can occur.
Well one day venturing around Ikea, I got inspired. I was thinking, what I could possibly do to make things a little bit easier for myself the next time one of these show up? If you have a small space like me, with not one clear wall with good natural light or many window options to let it in, here is a cheap DIY to consider. It cost me $12.99. And it was super easy to put together.
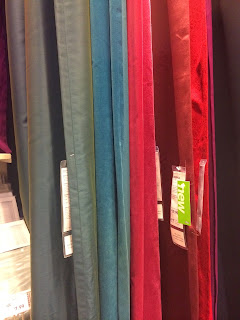
And I saw some curtains at Ikea for $9.99 as well that I planned to purchase. I was hoping to find blue or green as a lot of casting studios tend to use those two colors for backdrops. And I also had it in my head it would help the green in my eyes to pop out. However, see what happens when the light in the store hits it, never mind straight on light....you see right through it which defeats the purpose. They do have other options with thicker material that could work great. I loved the blue color.

These were $29.99 for two panels. They were nice and thick so light couldn't get through and had that soft velour like texture on one side. That is a good choice to make it more matte behind you and avoid the chance of shine from the sun. So its still a pretty good deal if you are going to use them as curtains to double as audition backdrops! For me, I only wanted one panel. So back to the drawing board but at least now I had a good idea of what I wanted. I am sure I could find what I need at a fabric store for much cheaper. But now measurements.....Which I would really know until I got it home and put it together.

I made sure to buy the rack the you could adjust for height. As a lot of times when directors ask for a "slate" they want to to say your name, agency, role your are reading, sometimes profiles, and also a body scan with the camera (which makes it hard to do by your self), all before going into the scene. Anyways with this in mind I knew I would need my rig to be taller than me. So here is the rub for some of you. I'm about 5'5"-5'6" And this just about suits me....with no heels on. So plan B will have to be raising it up a bit. So maybe looking for bed leg raisers or even stacking some sturdy books under the base. Fortunately most of your audition work can be sitting down though. And this won't even be an issue.


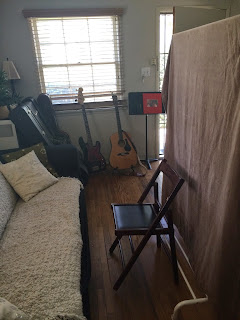
When I got home I remembered I had a brown curtain with the same material I need in my bedroom already. So I through it on to test it out before going out to buy more material. And It actually fit perfectly. The length and height happened to work great! We have a fold up chair I can throw in front of the backdrop and with the wheels attached to my rig it made it much easier to test the best window source to get natural light from.
 |
This is my window facing west, where the sun is over head a lot of the day and sets at night, I took this around 12-1pm. Its very bright. Taken between 12-1pm.
This is what the light source looks like from iPhone camera, with no hair or makeup, mind you. But I'm fully lit, its a good frame, and you can see my eyes!
Now playing around with my light sources from the north I have more options.
This gives me more of a dimensional look which might suit a scene a little better. I have light from the west, and two light sources from the north, a window & an open door.
This option is with the light from the west as well as just the window source from the north. Shutting the door seemed to give me a more dramatic look. You can see I do start losing the eyes a little bit though. Food for thought, the darker the shadows on your face the more concealer you might need. I have natural dark circles under my eyes and need to be careful NOT to enhance with bad lighting. Unless I am auditioning for a junkie! haha
Now for cameras! Whether you have a High Def or a iPhone you still need a tripod or a person to hold it for you. You have a little more control with a standard video recorder when it comes to a framing than with your iPhone if you want to use it in selfie mode (you can't zoom with iPhone if you want to see yourself). However you can always upload footage to iMovie and crop the frame if need be. My issue is my couch is right under my west side window so I had to be inventive here. Luckily I found a solution. It fit perfectly and snugly in my blinds that way even if I have a reader they don't have to worry about holding the camera and looking at the script at the same time. And I don't have to try and move my couch! Big Bonus!
If I film from the north side the window is further away so that is when I tripod would come in handy. I only have a desk top one but I can place it on a stool or an adjustable music stand....again, its a chance to improvise and be inventive.
Below is me, with natural/camera friendly makeup and hair styled with a tighter frame than the above iPhone photos. This shot was taken around 4pm. Which surprised me, since I wasn't expecting the lighting to still be this good. The later daylight from the west though seems to add a little bit of an orange filter which compliments my skin (a professional cinematographer told me that once and it stuck) and the color looks a little different with this camera lens verses the iPhone lens.

So here's proof your set up can be relatively cheap & effective. All this, ended up costing less than one session at a studio. However, keeping in mind I didn't invest in this camera (but would have iPhone as back up anyway) or the curtain, which would probably range from 5-15$ if I bought the appropriate amount of fabric at a fabric store. Which by the way using the rack I purchased from Ikea, a 7x4 to 8x5 piece of fabric would be ideal for a backdrop and I'm guessing would work for a lot of people. Consider the space you have to work with in your home and your own personal space you take up. We are all different shapes and sizes. Again this is more referring back to the need for those damn bodyshots.
Now since it would be a total eye sore in my small space to just have this rig out all the time, I purposely chose the Ikea Rack for the fact that they usually have products with easy assembly and dissembling ability. So my breakdown for this after the initial set up in super easy, in 4 pieces and can be stored in a small closet out of the way! Take off the top, two sides, and leave bottom with wheels together....out of the way, Like so...
Just to be extra efficient I suggest keeping instructions and screws separately labeled for safe keeping.
Now if you are getting so many self tape auditions at home and booking like crazy you can always use your hard earned money to invest in more professional equipment as you go. They have great lightening kits on Amazon ranging from $100-500. However, that's a lot of equipment to store. Also if it's too dark to get any natural light in, bulbs that were recommended to me from a director friend were Daylight CFL's 100 watts, which you can pick up at Home Depot that i could use with my boyfriends painter lamps. This this is the best small space solution in my mind. When I can afford a house, then I will have my own studio but until then.....HOPE THIS HELPS YOU FELLOW ACTORS OUT THERE.
Love from rain day LA!
xo-Nicole
|


WOW, that was AMAZING !!! YOU are so CREATIVE & so INFORMATIVE. GREAT BLOG, NICOLE <3
ReplyDeleteThanks lady! I like to help others learn from my mistakes! lol
ReplyDelete